A sound repair and an agreed appearance
Render repairs in Wilmslow | Patches, cracks and edges
A repaired patch can be technically sound and still look different from the wall around it. That distinction matters when planning render repairs in Wilmslow. The first task is to understand the defect and choose a compatible method; the second is to agree the finished appearance, including any broader decoration. Treating those as separate decisions produces a clearer contract than promising an invisible patch before the existing surface has been assessed.

On this page
Describe the defect and its history
Useful information includes where the damage is, when it was noticed and whether the same place has been repaired before. A crack beside a replaced frame has a different context from a detached patch below a leaking downpipe. Safe photographs of the whole elevation and the affected area can explain that context. They should support inspection rather than be treated as a complete diagnosis.
If a defect is changing or raises concern about the wall itself, appropriate building advice may be needed before a finish repair is specified. A decorative contractor should not be expected to resolve a structural question by selecting a stronger filler. Similarly, staining alone does not prove a particular moisture problem. Establish the relevant cause and extent, then define the work that follows from it.
- Map the damage Tapping finds hollow areas; cracks and their likely cause are noted.
- Cut back Failed render is cut out to a sound edge, usually squared off.
- Fix the cause Leaking gutters, sills without drips or render below the DPC are dealt with.
- Rebuild in coats Using a material compatible with the surrounding render and masonry.
- Blend the finish Texture is matched; colour may need a coating over the wider area.
The usual order of work. The survey and the chosen products decide the actual steps.
Inspect beyond the visible outline
The obvious crack or missing patch may not describe the full affected area. Adjacent render can have lost adhesion while remaining in place, and previous coatings may hide the boundary of earlier work. The assessment should identify what is suitable to retain and what needs removal. That prevents a repair being designed solely around the shape visible in a photograph.
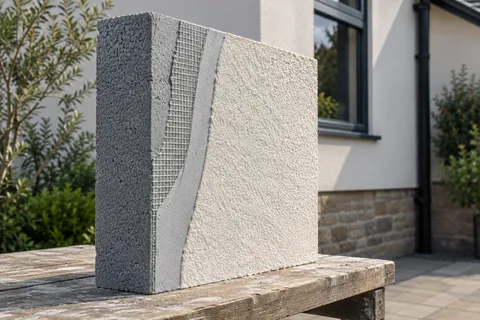
Where the defect follows a change in construction, the junction needs consideration. An extension connection, altered opening or infilled area may require a detail that accommodates the actual background. Reinforcement has a defined role within a system, but it is not a universal remedy for movement. The selected method should respond to the construction and the product requirements rather than repeat a previous failed patch unchanged.
Choose a compatible repair before solving the colour
Identify the existing render where possible, using records and appropriate assessment. The repair must suit the substrate and retained material, not merely resemble the wall when wet. On traditional fabric, lime repair principles may be relevant, particularly where harder later patches meet softer existing material. A stronger product is not automatically a better match for the building.
The repair extent should follow condition and the suitable method. If the owner also wants a uniform colour across the elevation, consider that as a finishing scope. A compatible render coating may be appropriate after repair, but it should not be assumed without checking the existing layers. The quotation should make clear whether it includes only the repair, a local decorative treatment or a whole-elevation colour change.
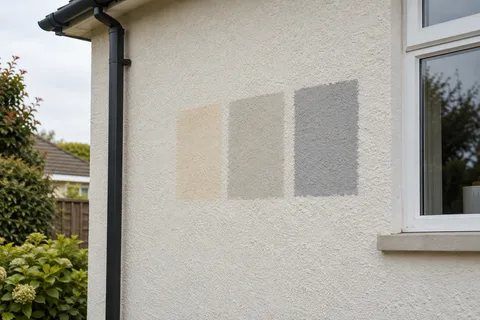
An example is a patch beneath a sill on a wall that has weathered for years. Matching the original product reference may help identify the material, yet the new patch can still differ from its surroundings. Enlarging the removal merely to chase a colour match can be unnecessary. A sample and an agreed decorative boundary allow the owner to choose the intended result without confusing appearance with the technical repair requirement.
| Technical question | Visual question |
|---|---|
| Has the cause been addressed? | Does the agreed finishing extent cover the repaired area? |
| Is the repair compatible? | Is the texture consistent with the approved reference? |
| Are the junctions complete? | Is any remaining patch difference expected? |
| Has the material reached the required condition? | Is this the right stage to judge colour? |
Coordinate any fittings that caused or obstruct the damage
Brackets, lights and pipe clips can affect the wall around them. If the fixing itself is defective or unsuitable, a new finish around it will not resolve that issue. Establish whether it needs alteration and which competent trade undertakes the work. The same applies where a replacement window or door has left unfinished edges. The surrounding detail should be ready before the final repair is completed.
Rainwater defects need particular attention where repeated wetting is present. Repairing a gutter or downpipe may sit outside the rendering contract, but it still needs a place in the project. The owner should know who arranges it and when. A cosmetic improvement that leaves the water source unchanged can quickly become another repair enquiry, regardless of how neatly the patch was finished.
Review the surface at the right stage
Agree how the repair will be inspected before any later coating conceals it. Then allow the material to reach the condition required for its final treatment and visual review. Product instructions should guide the sequence. A deadline based solely on convenience can create pressure to assess or decorate an area prematurely.
Texture deserves as much attention as colour. A patch may be close in tone but remain obvious because its grain or plane differs. The silicone rendering guide explains why the prepared surface influences a fine finish. Where defects are extensive or numerous, a more complete wall refurbishment may be worth comparing, but that decision should follow the assessment rather than an automatic preference for a larger contract.


Keep a short record of the finished repair
Retain the location, date, material and any coating reference. A marked photograph is useful where several patches were treated differently. It helps a future contractor understand what is on the building and gives the owner a baseline if the same area changes again. A receipt saying only render repairs completed leaves much less useful information.
If the repairs form part of whole-house work, include them as a defined stage in the programme and handover information. The final colour may make the exterior appear uniform, but the record should preserve which areas needed intervention. A good repair project leaves both a suitable surface and a realistic, shared understanding of its appearance.
Common questions
Why does a repair look darker when it is first applied?
Fresh material can appear different while it reaches the condition required by its specification. The exact behaviour depends on the product and circumstances. Agree when the finished appearance should be reviewed and whether further decoration is included, rather than treating the appearance immediately after application as the final result.
Can a new coating disguise every repair?
No. It may coordinate colour on a suitable prepared surface, but differences in plane or texture can remain visible. It also cannot replace investigation of an unresolved defect. Agree the repair and any wider decorative treatment as separate parts of the scope.
See housing and planning information for Wilmslow and nearby places, including the source and geography behind each figure.