Choose the texture in context
Silicone rendering in Wilmslow | Colour and fine texture
A silicone finish can give a house a fine, consistent-looking texture, but the selection involves more than choosing a pale colour from a chart. Grain size, the prepared surface and the materials beside the wall all influence the result. For a Wilmslow project, it is useful to consider the technical build-up and the visual sample together. The finish needs a suitable background, and the sample needs to be seen where the colour will actually be used.

On this page
Identify the complete system before comparing products
Silicone textured render commonly forms a thin decorative coat over a specified base. It is not a universal product that can be spread over any existing surface. The proposal should identify the preparation, relevant basecoat and reinforcement, finishing product and junction details. If it simply says silicone render, too much of the actual work remains undefined for a meaningful comparison.
Existing walls need particular attention. Paint may be weakly attached, old render may contain detached areas and earlier repairs may create different backgrounds. New work has its own requirements, including substrate readiness and movement detailing. In each case, the contractor should explain how the wall will reach the condition required by the chosen system. A visually tidy existing face is not proof that it is ready to receive a new coat.
| Still to identify | Why it matters |
|---|---|
| Base preparation | Determines whether the background suits the system |
| Grain size | Changes the surface texture and visual effect |
| Colour reference | Makes the approved choice identifiable |
| Junction details | Controls how the system meets openings and other materials |
| Care instructions | Guides cleaning, later coatings and alterations |
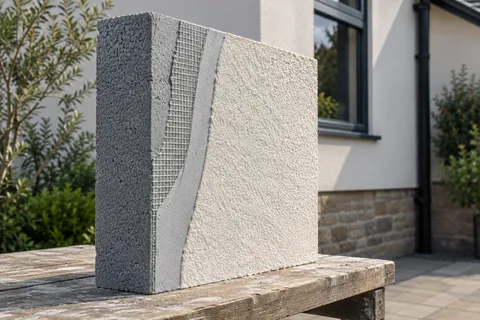
- Sound background A background accepted by the specified system. Keeping old render requires a system-specific assessment of its bond and condition.
- Beads Corner, stop and base beads set the edges and straight lines.
- Basecoat with mesh Glass-fibre mesh embedded in the basecoat resists cracking.
- Primer Where the system requires it, tinted towards the finish colour.
- Silicone finish A thin, through-coloured, water-repellent coat that forms the texture.
Wall on the left, finish on the right. Not to scale: coats, thicknesses and primers follow the chosen manufacturer’s system and the condition of the wall.
Pick the grain as well as the colour
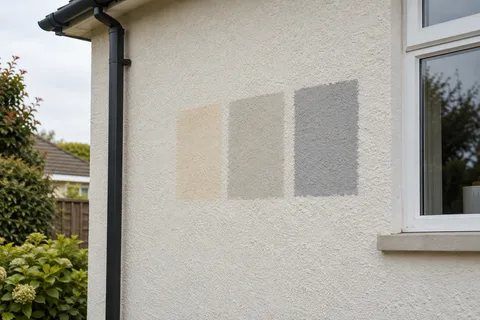
A fine grain and a more pronounced texture can change the same colour's appearance over a large wall. The surface catches light differently and may relate differently to brickwork, stone or window frames. Ask to see a representative physical sample of the proposed finish, then view it from the distance at which the elevation is normally seen. Close inspection and a view from the path answer different questions.
Do not make the entire decision from a photograph of another property. Camera processing, screen settings and lighting affect colour, while the sample wall may use a different grain or preparation. Reference images can still be useful for describing the style you like. The final approval should identify the actual product and finish proposed for this building, with a sample that gives those words a visible meaning.
Use retained materials to choose the sample position
Dark frames can make a pale render appear brighter; warm brick can change how a neutral colour is perceived. Place the sample where it can be considered beside those fixed elements. If the front and rear have different surroundings, review the choice in both contexts. A sheltered side wall is not always representative of the main elevation simply because it provides a convenient place for a test.
Where the existing textured system is sound and only its colour needs changing, a compatible coating or respray is a separate option. It should not be confused with installing a new silicone system. The difference lies in the preparation and build-up as well as the final appearance. Comparing those scopes helps avoid replacing sound material unnecessarily or treating decoration as a repair for an unsound background.


Coordinate the wall with its openings
A crisp finish around a window depends on the underlying reveal and frame detail being ready. If glazing is still to be installed or moved, settle that work before the final surface. Identify who forms the adjoining junction and who approves it. This matters particularly where an extension opening or a replacement frame changes the geometry assumed in the original rendering quotation.
For whole-house work, apply the same coordination to roof edges, downpipes and other attachments. A repeated colour does not remove differences between elevations. Movement joints and changes in substrate still require the appropriate detail. The system should be designed around those conditions rather than using reinforcement as a general promise that every junction can be made invisible.
Compare alternatives with the same starting assumptions
Monocouche rendering can offer a different mineral and often scraped appearance. If both options are being considered, compare complete specifications for the same assessed wall, including preparation and access. A decorative topcoat price by itself says little about the total work needed to achieve a suitable background and finished perimeter.
If external wall insulation is part of the project, the silicone finish is only one component of the insulation system. The added wall thickness changes reveals, roof edges and fittings. Select the complete assembly and resolve those details before treating the colour choice as the main decision. A render-only wall and an insulated wall may look similar while requiring substantially different work beneath the surface.
Plan the application and later care
Product instructions govern application conditions and the required state of earlier layers. The programme should allow for appropriate protection and for occasions when work cannot proceed as planned. The contractor also needs a practical sequence for broad uninterrupted areas so the agreed texture can be achieved consistently. These are execution decisions that should be settled before the finishing material is on the wall.
At handover, obtain the product references and care information. No exterior finish removes the need to maintain gutters, attachments and adjoining seals. Later cleaning or coating should suit the installed system, and new fittings should be detailed appropriately. For a limited wall project, retain the same information as for a full house. It makes a future repair or extension easier to plan than relying on a remembered colour description.
Common questions
Will the same colour look identical on every wall?
It may appear different where orientation, shade or neighbouring materials change. Texture also influences the effect. Physical samples on representative elevations help establish the intended appearance. The product and colour reference identify what is applied, but they cannot make all lighting conditions identical.
Can the final coat correct a poor basecoat?
It should not be expected to. The background and earlier layers need to provide the suitable surface specified for the decorative coat. Any necessary correction should be resolved before the final finish, using the selected system's requirements and an agreed appearance standard.
See housing and planning information for Wilmslow and nearby places, including the source and geography behind each figure.